Showing posts with label Plant unit. Show all posts

Wednesday, September 7, 2011

Science: Learning about Plants, lesson 7.4: Fruit and seeds

For this lesson, we read A Fruit is a Suitcase for Seeds by Jean Richards, which fit perfectly with our lesson.  It discussed different kinds of fruits and seeds as well as how seeds are dispersed.  After we read the book, we moved to the table to check out some fruit for ourselves.

First we discussed what kinds of seeds each fruit might have--which one they thought would have the biggest/smallest seeds, which might have a pit, which might have many seeds, etc.  They each chose a couple of fruits to draw before we cut them open.  This turned into an impromptu art lesson on how to use shading to create a 3-D look.
Connor drawing a plum

Brennan drawing a kiwi

Then we cut each fruit and examined the seed(s), discussing what we found and adding a cross-section drawing to the pages they had started.  Connor also wrote a sentence about what kind of seed was in each fruit he chose to draw.

Showing off his finished plum drawings

He worked HARD to get his lemon cross-section drawing like my example.  There were a few tears ("good enough" was NOT good enough for him!), but he finally got it!

Finishing his kiwi drawing

Checking out a nectarine pit

Finishing his nectarine drawing

Brennan wasn't interested in trying any of the fruit (getting him to eat ANY fresh fruits/veggies other than apples is almost impossible, and he's not a huge fan of apples either), but Connor was game and found a couple of new favorites--kiwis and plums.
Mango (he already knew he liked mango)

Kiwi!
Hands-on lessons are fun, but mouths-on lessons are even better! *grin*

Monday, August 29, 2011

Science: Learning about Plants, lesson 7.3: Pollination

We had fun learning about pollination!  By the time we "officially" did the lesson, we had come across pollination already in our reading, so Connor was pretty much able to explain the basics.  We read more details in  The Life Cycle of a Flower by Bobbie Kalman and learned about wind- and self-pollinated plants in addition to insect/animal pollination.  Then we got to the fun part!

We "acted out" pollination using cornmeal, pompoms, and other tidbits.  First we bent the ends of green pipe cleaners (cut in half) to make pistils and added tape sticky-side up on the top to make sticky stigmas.  Then we dipped q-tips in cornmeal for pollen-covered stamens.  Each of the boys chose a dark-colored pompom for his "insect" and brushed it up against the q-tip like a real bee or butterfly would brush against a real flower, observing the "pollen" transfer.  Then they flew their insects to a pistil (imagining it was in another flower) and brushed against its sticky stigma and noticed how the cornmeal stuck to it.  They had fun and wanted to try it several times!


(The medicine cup held the cornmeal.  It was the perfect size--deep enough to dip the q-tips in, but small enough that we didn't waste lots of cornmeal.)

The next part of the activity demonstrated wind pollination.  First we used a glue stick to create a sticky spot (maybe 2-3 inches in diameter?) on a small piece of black paper.  Then each of the boys got his own q-tip and dipped it in the cornmeal to make a pollen-covered stamen.  They held the q-tip carefully over the paper and blew on it gently to imitate wind blowing on a flower.  The "pollen" stuck to the paper, letting them see that it blew off and demonstrating how the wind blows pollen around and carry it to another flower.


We also made notebook pages that included some of the pictures of our project as well as narrations from each of them about pollination.

Thursday, June 30, 2011

Science: Learning about Plants, Lesson 5: Leaves

*This lesson stretched out over several days

We covered two main areas with regard to leaves--basic leaf structure and photosynthesis (you've never heard cute 'til you've heard a 5 year old saying photosynthesis! *grin*).

First we focused on leaf structure.  We read a little bit about leaves in What Is a Plant? and a pdf book from Montessori for Everyone, All About Plants (which you can find here--under the "Botany" heading).  We went on another leaf gathering expedition, during which they enthusiastically pointed out many examples of compound leaves.

When we got home, we examined and compared our leaves, talking about similarities and differences in shape, color, structure (i.e., parallel vs. palmate vein structure), size, etc.  We chose examples to draw and labeled the main parts (midrib, veins, margin, blade, tip, petiole).  We chose some leaves to press and started that process (placed them between layers of newspaper and set heavy books on top--will check on them in a couple of weeks) and then had fun doing more leaf rubbings.
Connor's labeled leaf drawing

Brennan's labeled leaf drawing
Leaf rubbings


Setting out leaves to press


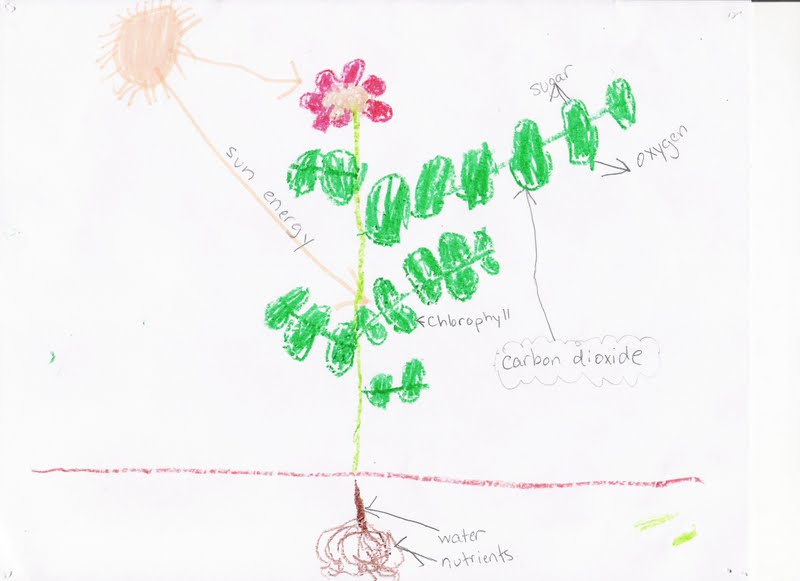
Our next lesson focused on photosynthesis.  We had already discussed that the function of a leaf is to produce food for the plant, so now we talked about the process.  Again, we read about it in What Is a Plant?, and then they watched this animated clip about photosynthesis.  Then we sat down and drew and labeled our own photosynthesis diagrams.  Connor did most of the work on his own with only a few suggestions from me about where to put labels and draw arrows.  I wrote for Brennan and helped him some, but he got quite a bit of it on his own.

Connor's photosynthesis diagram

Brennan's photosynthesis diagram (with Mom's help!)


We've only done one experiment with leaves so far: we steeped a leaf in boiling water for a few minutes, then let it sit in very warm rubbing alcohol for a couple of hours.  When we checked back, the rubbing alcohol was green--it had leached out some of the chlorophyll.

Thursday, June 16, 2011

Science: Learning about Plants, Lesson 4: Stems

*This lesson stretched out over several days.

We read the section on p. 10 of What Is a Plant? about stems and discussed it.  I didn't focus on the technical terms, but we did discuss that plant stems help hold a plant up and  have tubes inside them that are used to transport water and food within the plant.  We examined a large-ish stem (some kind of a weed from outside), talking about how strong it was, and then we cut it open to see what was inside (we did a cross-section cut first and then split it down the middle.

Our big experiment medium for this lesson was celery because the tubes in the stem are visible to the naked eye.


We examined a piece of celery, and then we left one uncovered in the refrigerator for a few days to see what would happen.  When it was nice and wilted, we put it in water, and the boys were impressed with how quickly it perked up and became firm again--a great illustration that the piece of celery was transporting the water from the glass through the tubes in its stem.

We also used colored water to dye celery stalks.  We filled some glasses with water, added red, blue, and purple (combining red and blue) food coloring, and then put the celery in the colored water.

Red--you can clearly see where the food coloring has dyed the tubes

Blue

Purple
After just a few hours, the color was visible at the top ends of the stems and a bit in the leaves.  After 24 hours, it could clearly be seen in the leaves.

Red food coloring + green plant = brown!

Blue

Purple
We also had fun dyeing carnations.  We bought some white carnations and put them in colored water, and over the next few days we watched the color appear in the flowers.  We also split the stems of two of the carnations and put each part in a different color to see what would happen to the flower.


You can see the split stems here--one was in yellow (looks orange) and purple and the other is in green and red.

One day later: the split-stem flower that was in red and green--you can see both colors

Yellow and purple

Yellow--this was the clear winner all the way through.

After one week (minus the split stems--they wouldn't stand up after a couple of days)
The only thing we haven't done yet that I'd like to do relating to stems is to go out and make some bark rubbings from different trees.  It's just been soooo hot here lately (hovering around 100*, up to 103* a few days).  We'll see if we can work it in later!

Monday, June 13, 2011

Science: Learning about Plants, Lesson 3: Roots (follow-up)

We've had mixed results on our plant experiments so far.  The avocados both grew mold and didn't sprout, and in the first attempt at sprouting lima beans, I kept the paper towels too wet and they began to break down.  The second attempt worked beautifully, however!

After just a few days: the root has sprouted and is growing down.  Then we turned the jar upside down to see what would happen to the root.

Several days later, the root has turned to continue growing down.

Both boys made notebook pages about roots (Brennan dictated his info for me to write), and we've been working on our plant memory work.
Connor's notebook page (front and back):

Brennan's notebook page:

We also did an experiment to see that the roots of a plant will soak up water.  We took a plant and carefully removed it from the potting soil, brushing off as much dirt as possible.  We filled a glass jar with water, measuring the water as we filled it (5 cups).  Then we put plastic wrap across the top of the jar and inserted the roots through a slit.  We covered any exposed opening with more plastic wrap to prevent water from evaporating.  After a week, we measured the water again and discovered that the plant's roots had absorbed about 1/2 cup of water.